Kubernetes is a container orchestration system. When a backend contains many distinct services that need to be kept running across nodes, with cross communication and scaling, an orchestration system becomes essential. And with the growing popularity of containers, using Kubernetes for orchestration has grown in popularity as well.
With containers and Kubernetes we have common methods of deployment, discovery, scaling and monitoring across all the languages and runtimes within our system. In this chapter we will go over the core components of Kubernetes and how to use them to deploy and manage the service_discovery service we built in the previous chapters.
Running Kubernetes
In order to develop and test the Kubernetes deploy, we will need to run Kubernetes locally for testing purposes. The following sections were written with kind as the local test Kubernetes but should work on any of the local or cloud options for running Kubernetes. The tool ctlptl is used for managing the test Kubernetes clusters in this text. It supports multiple bankends, making it even easier to swap out the one used here for your preferred solution. Instructions for Continuous Integration and deployment to production will use Google Kubernetes Engine. But the majority of the content should work easily with any of the offerings in the following two sections.
Locally
- kind: Kubernetes in Docker is a projected backed by a Kubernetes SIG for running Kubernetes in Docker originally for testing Kubernetes itself.
- microk8s: An offering from Canonical, the company behind Ubuntu, but runs on many Linux distros, Windows and MacOS. microk8s is simple to install and get started with, and it runs locally, not within a VM like minikube, so is less of a resource hog.
- minikube: The oldest and most flexible option, that is also now an official part of the Kubernetes project.
minikubeoffers support for various hypervisors and has an option to run without creating a new virtual machine, but it still suggests doing so within a Linux VM. - k3s and k3d: k3s is lightweight Kubernetes from Rancher Labs. k3s removes legacy and non-default features to cut down on size and replaces etcd with SQLite3, making k3s a good option for CI and local testing. k3d is a helper for running k3s in Docker.
- Docker for Mac Kubernetes: The easiest to get going with when running on MacOS.
- Docker for Windows: The easiest to get going with when running on Windows.
All of these, minus microk8s, are supported by ctlptl.
Production
All the big cloud providers offer managed Kubernetes clusters:
- Google Kubernetes Engine:
Google Cloud was used for this chapter when not using
kind, because it offers $300 of credit when signing up as a new user - Digital Ocean Kubernetes
- AWS Elastic Container Service for Kubernetes
- Azure Kubernetes Service
There are many more options for deploying to the cloud or on-premise. Many factors go into play when choosing a solution, like in the case of an existing company, where are your services currently being hosted. Luckily with Kubernetes your deployment will not be locked in to any one provider.
Deployment
In Kubernetes, containers are part of a Pod. Each Pod has 1 or more containers, and 0 or more init-containers which run once to completion before the other containers are started. For an application, a higher level abstraction called a Deployment is used, so individual Pods don’t have to be manually created for deploying or scaling. A Deployment is a declarative way to create and update the Pods of an application.
Each Kubernetes resource is defined in a yaml file containing the apiVersion, the kind of resource, metadata, such as a name, and the resource’s specification:
apiVersion: apps/v1
kind: Deployment
metadata:
  name: service-discovery
spec:
[...]
The Deployment spec entries we will cover here are selector, replicas, and template. The selector is a specification for which Pods belong to a Deployment. matchLabels means that Pods with the label app with value service-discovery, within the same Namespace, will be considered part of the Deployment. replicas declares how many instances of the Pod should be running.
spec:
  selector:
    matchLabels:
      app: service-discovery
  replicas: 1
  template:
[...]
The template section is a Pod template and defines the specification of the Pods to be run by the Deployment:
template:
  metadata:
    labels:
      app: service-discovery
  spec:
    shareProcessNamespace: true
    containers:
    - name: service-discovery
      image: service_discovery
      ports:
      - containerPort: 8053
        protocol: UDP
        name: dns
      - containerPort: 3000
        protocol: TCP
        name: http
      - containerPort: 8081
        protocol: TCP
        name: grpc
First, the Pod metadata sets the label to match with the selector from the Deployment spec – in the upcoming section Using Kustomize to Simplify Deployment we will see how the need to define the labels twice is removed. Then, the Pod spec has a list of containers. In this case there is one container that exposes ports for accessing through DNS, HTTP and GRPC.
The Zombie Killer!
The issue of zombie processes (processes who exit but their PID sticks around because the parent hasn't called wait()) discussed in the Docker chapter applies to running containers with Kubernetes as well. One way to protect against them, and the one used in the service_discovery project is to use a shared process namespace between containers in the Pod.
This is done with shareProcessNamespace: true in the Pod spec. This setting means the process started in the container will not be PID 1. Instead, PID 1 is the Kubernetes pause container. The pause container is always the parent container in a Pod but with this setting, making it PID 1 for all processes in the Pod, it is able to reap zombies processes that might result from any container in the Pod.
Read more about shared process namespaces in the Kubernetes docs.
Container Resources
Each container spec in the Pod spec can include resource requests and limits for memory and CPU. Requests are used to schedule the pod. Scheduling involves choosing a node that the requested CPU and memory is available (not already requested by other Pods on the node).
resources:
  requests:
    memory: "250Mi"
    cpu: "500m"
  limits:
    memory: "1Gi"
    cpu: "2000m"
Additionally, CPU requests are translated to the cgroup property cpu.shares.
Shares are a relative weight that is used to calculate the share of the CPU’s
the cgroup will get. The default is 1024 but, since it is a relative weight,
this tells us nothing without knowing the values of the other processes. If
there are 2 processes, each with the default share of 1024 then each gets half
the CPU time. If there are 3 processes, each with the default share of 1024 then
they each get a third of the CPU time.
The limits are translated to the cgroup property cpu.quota. These are CPU
bandwidth controls for the Linux kernel scheduler to enforce on the process.
Bandwidth control has a period, which is some number of microseconds, and a
quota, the maximum number of microseconds a process can use within a period. The
period is always 100000 microseconds, so in the case of the example above with
CPU limit set to 2000m the cgroup quota set will be 200_000, meaning 2 CPUs can
be used every 100_000 microseconds.
If the limit is exceeded during a period, the kernel will throttle the process by not allowing it to run again until the next period. This can have a major impact on performance. There are a few main pieces of an Erlang program to be aware of to ensure you stay within your the allocated limit. The first is that the Erlang VM is multi-threaded. The VM creates threads for running schedulers that schedule the running of its internal processes. Running 2 threads when limited to 1 CPU core can easily run over the allocated quota. These schedulers won’t simply hand back time to the kernel if they run out of processes to schedule either. Instead, to reduce latency in case something quickly becomes runnable again, the Erlang scheduler enters a busy wait loop.
A busy wait is a tight loop an Erlang scheduler will enter waiting for more work to do before eventually going to sleep. This tight loop burns CPU just waiting to do actual work and can lead to much worse performance because your Erlang program will be likely to get throttled by the kernel scheduler. Then when there is actual work to be done, it may happen in a period the Erlang VM gets no CPU slices at all. This will be even worse if the VM is running more schedulers than CPUs it is allocated. The CPU limit of 2000m, which we think of as meaning 2 CPU cores, does not actually restrict the process to 2 cores. If 8 schedulers are being used and there are the same number of cores on the node, those 8 will still spread across all the cores and run in parallel. But the quota is still 200000 and more likely to be exceeded when 8 schedulers are taking time on 8 cores. Even without the busy wait, a scheduler must do work of its own and can be unnecessary overhead when trying to stay within some CPU usage constraints.
In order to disable the scheduler busy waiting we set the VM arguments +sbwt in vm.args.src as shown here:
+sbwt ${SBWT}
As of OTP-23
With OTP-23, released in 2020, the Erlang VM is "container aware" and will s
the proper number of active schedulers automatically based on the containers
allocated resources. Before OTP-23 the +S argument was needed to
set the number of active schedulers equal the container's CPU limit.
Additionally, +sbwt defaults to very_short
since OTP-23. This is an improvement but it is likely you still want to set the value to none when running in Kubernetes, or similar environment. But, as always is the case, be sure to benchmark to find the optimal value for your particular workload.
Container Environments and ConfigMaps
As we’ve seen in the Releases chapter, runtime configuration is done through environment variable substitution in vm.args.src and sys.config.src. We therefore have to insert those variables to the environment of the container. Each container in a Kubernetes Pod can have an env field declaring a set of environment variables. The simplest case is explicitly providing a name and a value:
env:
- name: LOGGER_LEVEL
  value: error
- name: SBWT
  value: none
This configuration would result in the environment variable LOGGER_LEVEL with value error.
There are other environment variables that must be set based on the state of the container that is running. An example of this is setting the NODE_IP variable based on the IP of the Pod:
env:
- name: NODE_IP
  valueFrom:
    fieldRef:
      fieldPath: status.podIP
The status.podIP declaration under fieldRef will return the current Pod’s IP when it is created.
The user-defined environment variables like LOGGER_LEVEL can be better tracked in a Kubernetes resource specifically for configuration called a ConfigMap. A ConfigMap contains key-value pairs and can be populated from files, directories of files or literal values. Here we will use a literal value to set LOGGER_LEVEL to error:
apiVersion: v1
kind: ConfigMap
metadata:
  name: configmap
data:
  LOGGER_LEVEL: error
Then back in the Deployment resource the LOGGER_LEVEL value can be made a reference to the ConfigMap:
env:
- name: LOGGER_LEVEL
  valueFrom:
    configMapKeyRef:
      name: configmap
      key: LOGGER_LEVEL
A shortcut for bringing in all the variables defined in a ConfigMap as environment variables for the container can be done with envFrom:
envFrom:
- configMapRef:
    name: configmap
Now all the variables defined in the ConfigMap will be added to the container without having to individually specify each one. For more on defining ConfigMaps see the upcoming section Using Kustomize to Simplify Deployment.
tip
Updating a value in a ConfigMap will not trigger the Deployments that have references to the ConfigMap to restart their containers with the new environment variables. Instead, the way to update the containers when the configuration changes is to create a new ConfigMap with the necessary changes and a new name, then modify the name of the ConfigMap referenced by the Deployment under configMapRef. The old ConfigMaps will eventually be garbage collected by Kubernetes since they are not referenced anywhere and the Deployment will recreate its Pods with the new configuration.
Init Containers
Our release of service_discovery depends on a Postgres database for storing state, to ensure the database is properly setup before running our containers we will use an Init Container. Each Init Container is a container that runs to completion before any of the main containers in a Pod are run. The database migration tool flyway we are using for running migrations is used to validate the database is up to date before allowing the main containers to run:
volumes:
- name: migrations
  emptyDir:
    medium: Memory

initContainers:
- name: flyway
  image: flyway/flyway:9.22
  name: flyway-validate
  args:
  - "-url=jdbc:postgresql://$(POSTGRES_SERVICE):5432/$(POSTGRES_DB)"
  - "-user=$(POSTGRES_USER)"
  - "-password=$(POSTGRES_PASSWORD)"
  - "-connectRetries=60"
  - "-skipCheckForUpdate"
  - validate
  volumeMounts:
  - name: migrations
    mountPath: /flyway/sql
    env:
    - name: POSTGRES_SERVICE
      value: POSTGRES_SERVICE
    - name: POSTGRES_DB
      value: POSTGRES_DB
    - name: POSTGRES_USER
      value: POSTGRES_USER
    - name: POSTGRES_PASSWORD
      value: POSTGRES_PASSWORD

- name: service-discovery-sql
  image: service_discovery
  command: ["/bin/sh"]
  args: ["-c", "cp /opt/service_discovery/sql/* /flyway/sql"]
  volumeMounts:
    - name: migrations
      mountPath: /flyway/sql
The volume migrations exists only in memory and is used to copy the current SQL migration files from the release image to a shared directory that the flyway container will use to run validation. The emptyDir type of volume with medium memory is used because we are not using this volume to persist any data, only to share between two Init Containers. If medium: Memory was not included, the emptyDir is created on the host file system but it is still empty initially for each new Pod, and is removed when the Pod is deleted.
Readiness, Liveness and Startup Probes
Each container in a Pod can define a readiness, a liveness, and a startup probe.
Probes are defined either as a command to execute in the container, as an HTTP
GET request made to a given port and path, or as an attempt to open a TCP
connection to a specific port.
LivenessProbe
While Kubernetes will restart any failed container, there are some times where a
process becomes unresponsive but is still technically alive, such as deadlocks.
A livenessProbe can be used for such cases, where failing to respond prompts a
restart. But failing to respond in time could mean the process is busy doing
useful work and inflicting additional churn on the Deployment by restarting
those that are busy would only make the matter worse since that work will have to
still be done by some Pod, potentially leading to a cascade of failures as
containers are continually being restarted. For this reason if a livenessProbe
is included it should be kept extremely simple and the timeout and threshold
carefully chosen. It is more often than not safer to leave out the livenessProbe
entirely and rely on node crashes, metric based alerting and auto-scaling.
Not using the livenessProbe for this purpose means the containers are still
available, since they aren’t killed, and the reason for failing the check can be
examined. This may mean attaching a shell if it isn’t completely frozen or
forcing a crash dump to be written. In a very resource constrained environment
you may prefer to have the livenessProbe in order to have deadlocked containers
and their Pods cleaned up right away, instead of waiting for manual intervention
and the auto-scaler to scale down after load falls.
ReadinessProbe
A common misconception is that a readinessProbe is meant for keeping a Pod out
of service until it is fully booted. This was not really the case and in
Kubernetes 1.16 an additional probe, startupProbe, was added to handle this.
Read more about startupProbe in the following section. A readinessProbe is also
not needed for graceful shutdown. When a shutdown is initiated Kubernetes will
have the Pod removed from service.
The actual main use for the readinessProbe is if the application has to
periodically do work that it can’t be handling requests during or you have
to do some sort of maintenance/inspection that also warrants a period of not
receiving requests.
In Erlang a readinessProbe manual toggle could be implemented with a
persistent_term or any other way of sharing a value that allows the user to
connect to a remote console and toggle it on/off. With a Horizontal Pod
Auto-Scaler the Deployment would then be scaled up if needed as the other Pods
would now be receiving additional traffic.
readinessProbe is also important if the reason for not including the livenessProbe is
to allow deadlocked nodes to be inspected. A deadlocked node will fail the
readinessProbe until being removed from the service so users do not receive
timeouts but the Pod remains available for inspection.
In the Pod configuration nothing special is needed to have a graceful shutdown,
whether it is during a deploy, livenessProbe failure or scale down. Erlang will
call init:stop() when SIGTERM is sent by Kubernetes to signal shutdown. As
discussed in Releases, each Applications will be stopped in the reverse they
were started and each Application’s supervision tree terminates children in
reverse order. This doesn’t mean Application shutdown doesn’t have to be handled
appropriately and carefully, only that the `Pod` configuration itself does not
need a special setting to delay the Release from halting. Instead it is up to
each Application to perform a graceful shutdown. For example, an Application
that starts an HTTP server should wait until the open requests are handled
before the `stop` callback returns.
However, there is a limit to how long shutdown can take. By default the shutdown
can wait up to 30 seconds (configurable with the terminationGracePeriodSeconds
PodSpec option) before Kubernetes sends a SIGKILL signal that will force the
process to terminate.
StartupProbe
It can be preferred to be absolutely sure a client does not receive a
“connection refused” error in response to a request while the application is
booting and to do this startupProbe should be used instead of readinessProbe.
Unlike readinessProbe the startupProbe will only be checked until it passes, not
periodically for the life of the Pod. If startup doesn’t take many seconds or
minutes, and clients are not negatively effected by simply having to do retries
it isn’t needed. To do this in the service_discovery project uses a
startupProbe:
startupProbe:
  httpGet:
    path: /ready
    port: http
  initialDelaySeconds: 3
  periodSeconds: 2
Because the boot order of the Release ensures there are available connections to the database and DNS is up before the Elli server is started the probe only needs to be check that the HTTP server is up and is written as:
handle('GET', [<<"ready">>], _Req) ->
    {ok, [], <<>>};
This function will match a GET request to /ready and returns a 200 response
immediately. There are no additional checks of functionality of the service
except that it is able to receive and respond to HTTP requests.
The startupProbe becomes even more important if booting takes many seconds or
minutes, especially if a livenessProbe is defined. In the case of
service_discovery there could be a feature to load some or all DNS records into
a local cache, which takes time. If this loading is resource intensive and would
have negative impacts beyond simply meaning a request must go to the database
instead of the cache until the load completes it may be beneficial to instead
define a startupProbe and not have it pass until the loading is complete. When a
livenessProbe is also defined it could mean the startup never completes because
the livessnessProbe fails beyond its allowed failureThreshold and the Pod is
killed, this would then happen to every Pod that attempts to boot and the
Deployment would never succeed, or take much longer if sometimes the
livenessProbe doesn’t fail beyond its threshold.
Rolling Deployments
Kubernetes Deployment resources have a configurable strategy for what happens when a new version of an image is deployed. The service_discovery Deployment uses a rolling update strategy. An alternative strategy is Recreate which means Kubernetes first terminates all Pods in the Deployment, and then starts the new Pods. For the RollingUpdate strategy the Kubernetes Deployment controller will bring up new Pods and then terminate the old. There are two configuration variables to tell the controller how many Pods above the desired amount are allowed (maxSurge) and how many are allowed to be unavailable during the deploy (maxUnavailable).
strategy:
  type: RollingUpdate
  rollingUpdate:
    maxUnavailable: 0
    maxSurge: 25%
service_discovery is configured with a maxUnavailable of 0 and maxSurge of 25%.
This means that if the `Deployment` has 4 replicas one new Pod will be started,
and when that Pod is ready one of the old Pods will begin termination, and
this process will continue for each Pod. If probes are defined then to be
ready first the startupProbe must pass and then the readinessProbe.
Service
A Service is a resource for defining how to expose an application on the network. Each Pod has its own IP address and can expose ports. A Service provides a single IP address (the Service's ClusterIP) and can map a port on that IP to the exposed port for each Pod of the application. In the following resource definition a Service named service-discovery is created with a selector of app: service-discovery to match the Pods created in the previous section:
kind: Service
apiVersion: v1
metadata:
  name: service-discovery
spec:
  selector:
    app: service-discovery
  ports:
  - name: dns
    protocol: UDP
    port: 8053
    targetPort: dns
  - name: http
    protocol: TCP
    port: 3000
    targetPort: http
  - name: grpc
    protocol: TCP
    port: 8081
    targetPort: grpc
The Deployment's container exposed three ports and gave each one a name, dns, http and grpc. The Service uses those names as the targetPort for each port it exposes. With this resource applied to a Kubernetes cluster there will be an IP listening on those three ports that will proxy to one of the running Pods.
A proxy (kube-proxy) is used to route traffic to Pods instead of adding each Pod IP to a DNS record because of the rate of change for what Pods are actually running for a Service. If DNS were used it would require a low or zero time to live (TTL) and depend on the client to fully respect the TTL value. Having every request be routed through a proxy means as long as the proxy’s data has been updated the right set of Pod's will be routed to.
Kubernetes-aware DNS services, like CoreDNS, will watch for new Services and create DNS records [service-name].[namespace] for each service. When using named ports, like the three ports in the service-discovery Service, there are also SRV records created of the form _[name]._[protocol].[service-name].[namespace]. Querying the DNS service for the SRV record, such as _http._tcp.service-discovery.default will return the Service DNS name service-discovery.default and port 3000.
In a later section on clustering we will see how to use a Headless Service (a Service with ClusterIP set to None) resource and named ports for connecting Erlang nodes over distributed Erlang without the Erlang Port Mapper Daemon (epmd).
Using Kustomize to Simplify Deployment
Now that we have talked about the two main Kubernetes resources used for our application we can go into how we would actually write and deploy these resources. The reason the YAML shown in the previous sections for each resource is not used for deployment is that it is static, at times repetitive (like having to define the same set of labels in a Deployment twice) and requires manually modifying or having duplicates of the resources for deploying to different environments which require different configuration. We need something that makes it easy and clear to do changes like updating the image used in a container, using a different name or namespace for resources depending on the environment or using different values for a ConfigMap depending on the environment.
There are a few open source options for working with Kubernetes resources. The two most popular are Helm and Kustomize. Both are part of the Kubernetes project but have very different solutions to the problem. Helm uses Go templates for writing and rendering YAML. Some, this author included, find templating YAML to be overly complex, error prone and just plain annoying. Luckily, the other solution, Kustomize, does not rely on templates.
Helm 3
Even if Helm is not used for deployment of your project itself it can still be useful for deployment of dependencies. There are a lot of Helm Charts available and is likely how you would want to offer your project to the outside world if it was not simply for internal usage.
There were a number of issues with Helm aside from the templating that we won't get into here, except to say that they are being worked out in the latest major release, Helm v3, that had its first stable release in November 2019. So I would still suggest taking a look at the latest offering from Helm for yourself.
Kustomize is a kubectl built-in tool (as of v1.14.0) that provides a template-free way to customize Kubernetes YAML resources. We will use it to create different configurations for various environments, starting with a development environment, dev, which will then be used in the next section, Tilt for Local Development, to run service_discovery locally.
The setup is a base configuration with overlays for different environments. Overlays can add additional resources and make modifications to the resources from the base layer. The directory layout for the base configuration and two overlays is:
$ tree deployment
deployment
├── base
│   ├── default.env
│   ├── deployment.yaml
│   ├── init_validation.yaml
│   ├── kustomization.yaml
│   ├── namespace.yaml
│   └── service.yaml
├── overlays
│   ├── dev
│   │   ├── dev.env
│   │   └── kustomization.yaml
│   └── stage
│       ├── kustomization.yaml
│       └── stage.env
└── postgres
    ├── flyway-job.yaml
    ├── kustomization.yaml
    ├── pgdata-persistentvolumeclaim.yaml
    ├── postgres-deployment.yaml
    └── postgres-service.yaml
The base kustomization.yaml includes the main resources of the service_discovery project, a Namespace, Deployment and Service:
apiVersion: kustomize.config.k8s.io/v1beta1
kind: Kustomization
namespace: service-discovery
commonLabels:
  app: service-discovery
resources:
- namespace.yaml
- deployment.yaml
- service.yaml
The labels under commonLabels will be added to each resource and simplifies the Deployment configuration from the earlier section by being able to remove both the labels entry and the selector. So now the Deployment resource, found in deployment/base/deployment.yaml for service_discovery looks like:
apiVersion: apps/v1
kind: Deployment
metadata:
  name: service-discovery
spec:
  replicas: 1
  template:
    spec:
      containers:
      - name: service-discovery
        image: service_discovery
[...]
Kustomize will insert the labels under the metadata when rendering the resources, as well as inserting the same labels under the spec’s selector field matchLabels automatically. To see what Kustomize generates run kubectl kustomize on the base and it will print the resources to stdout:
$ kubectl kustomize deployment/base
[...]
apiVersion: apps/v1
kind: Deployment
metadata:
  labels:
    app: service-discovery
  name: service-discovery
  namespace: service-discovery
spec:
  replicas: 1
  selector:
    matchLabels:
      app: service-discovery
  template:
    metadata:
      labels:
        app: service-discovery
[...]
Another feature for improving creation of Deployments is generation of ConfigMaps. In the previous section on environment variables and ConfigMaps we ended with a Deployment that included environment variables from the data in a ConfigMap:
envFrom:
- configMapRef:
    name: configmap
With Kustomize’s configMapGenerator we can declare that the ConfigMap be generated from any file with lines like VarName=VarValue:
configMapGenerator:
- name: configmap
  envs:
  - dev.env
The content of dev.env is:
LOGGER_LEVEL=debug
The resulting ConfigMap seen in the output for kubectl kustomize deployment/overlays/dev is:
apiVersion: v1
data:
  LOGGER_LEVEL: debug
kind: ConfigMap
metadata:
  labels:
    overlay: dev
  name: configmap-dev-2hfc445577
  namespace: service-discovery-dev
Note that the name is no longer simply configmap but instead configmap-dev-2hfc445577. Kustomize will create a new ConfigMap with a different name if the content changes and it will update any reference to the ConfigMap. Updating the reference to the ConfigMap in the Deployment spec ensures that Pods are restarted when their configuration changes. Simply modifying a ConfigMap would not otherwise result in an update to the running Pods. So in the Kustomize output the Deployment will have:
- envFrom:
  - configMapRef:
      name: configmap-dev-2hfc445577
The same is done for Secrets.
To apply the resources generated by Kustomize in one step the -k option can be passed to kubectl apply:
$ kubectl apply -k deployment/overlays/dev
This command will generate the resources based on the dev overlay and apply them to the Kubernetes cluster.
Database Migrations
Jobs
A Kubernetes Job creates one or more Pods and runs them until the specified number of them complete successfully. In the case of database migrations for service_discovery the Job is one Pod with a container running Flyway sharing a Volume with an initContainer which copies over the SQL files from the image of service_discovery being deployed. Being initContainers means they must all run to completion and succeed (finish with a status code of 0) before the main containers of the Pod are started. So before flyway migrate can be run by the main container of the Job’s Pod the container with the migrations, it is actually the same image with the full service_discovery release we use to run the Deployment, must have successfully copied the migration to the shared Volume under directory /flyway/sql:
apiVersion: batch/v1
kind: Job
metadata:
  labels:
    service: flyway
  name: flyway
spec:
  ttlSecondsAfterFinished: 0
  template:
    metadata:
      labels:
        service: flyway
    spec:
      restartPolicy: OnFailure
      volumes:
      - name: migrations
        emptyDir:
          medium: Memory

      containers:
      - args:
        - "-url=jdbc:postgresql://$(POSTGRES_SERVICE):5432/$(POSTGRES_DB)"
        - -user=$(POSTGRES_USER)
        - -password=$(POSTGRES_PASSWORD)
        - -connectRetries=60
        - -skipCheckForUpdate
        - migrate
        image: flyway/flyway:9.22
        name: flyway
        volumeMounts:
        - name: migrations
          mountPath: /flyway/sql
        env:
        - name: POSTGRES_SERVICE
          value: POSTGRES_SERVICE
        - name: POSTGRES_DB
          value: POSTGRES_DB
        - name: POSTGRES_USER
          value: POSTGRES_USER
        - name: POSTGRES_PASSWORD
          value: POSTGRES_PASSWORD

      initContainers:
      - name: service-discovery-sql
        image: service_discovery
        command: ["/bin/sh"]
        args: ["-c", "cp /opt/service_discovery/sql/* /flyway/sql"]
        volumeMounts:
          - name: migrations
            mountPath: /flyway/sql
The trouble with using a Job for migrations is applying a set of Kubernetes YAML resources can not update the image of a completed Job and cause it to be rerun. Applying a Job of the same name with a different service_discovery image will result in an error. There are a couple options to deal with this limitation.
One option, which is still an alpha feature as of Kubernetes 1.16, is setting ttlSecondsAfterFinished: 0 in the Job specification. With this setting the Job will be eligible for deletion immediately after completion. Then, when the next deployment applies the new Kubernetes resources a new Job will be created, instead of attempting to update the Job from the last deployment.
The ttlSecondsAfterFinished options is still an alpha feature and requires manually enabling. You can try the feature on Google Cloud by creating an alpha cluster, but these clusters can only live for 30 days. An alternative solution is to manually (or with a script that can run in a CI pipeline) run migrations and delete the Job after completing a deployment.
An advantage of running the Job separately from the main kubectl apply is the deployment can be stopped if the Job failed.
Validating the Migration
If we want to be sure our service_discovery container does not start until the database has been successfully migrated the flyway command validate can be used. The container running flyway validate will succeed once the database it is checking has run all the migrations. The resulting container setup is essentially the same as in the last section when we did the migrations, but instead of migrate the command is validate and both the flyway container and the container copying the migrations to the shared volume are initContainers in this case:
apiVersion: apps/v1
kind: Deployment
metadata:
  name: service-discovery
spec:
  replicas: 1
  template:
    spec:
      volumes:
      - name: migrations
        emptyDir: {}
      initContainers:
      - name: service-discovery-sql
        image: service_discovery
        volumeMounts:
          - name: migrations
            mountPath: /flyway/sql
        command: ["/bin/sh"]
        args: ["-c", "cp /opt/service_discovery/sql/* /flyway/sql"]

      - image: flyway/flyway:9.22
        name: flyway-validate
        args:
        - "-url=jdbc:postgresql://$(POSTGRES_SERVICE):5432/$(POSTGRES_DB)"
        - "-user=$(POSTGRES_USER)"
        - "-password=$(POSTGRES_PASSWORD)"
        - "-connectRetries=60"
        - "-skipCheckForUpdate"
        - validate
        volumeMounts:
        - name: migrations
          mountPath: /flyway/sql
        env:
        - name: POSTGRES_SERVICE
          value: POSTGRES_SERVICE
        - name: POSTGRES_DB
          value: POSTGRES_DB
        - name: POSTGRES_USER
          value: POSTGRES_USER
        - name: POSTGRES_PASSWORD
          value: POSTGRES_PASSWORD
Each init container is run in order to completion before the next is started, which makes the order in this case very important. If the container which copies the migration files to /flyway/sql were not first in the list of initContainers, and required by Kubernetes to run to successful completion before the next container is started, the migrations would not be copied to the volume before flyway is run.
Tilt for Local Development
Tilt is a tool for deploying and updating Docker images and Kubernetes deploys
locally for development purposes. By default it will only build and deploy
services against a local Kubernetes, such as kind, microk8s, etc. to safeguard against accidentally sending your development environment into production!
The easiest way to get started with Tilt is using ctlptl to create a kind
cluster which also runs a Docker image registry. This will be used for storing
the images that get used by your Kubernetes Pods. For kind with ctlptl a
registry can be enabled easily through its support for a cluster configuration
file:
apiVersion: ctlptl.dev/v1alpha1
kind: Registry
name: ctlptl-registry
port: 5005
---
apiVersion: ctlptl.dev/v1alpha1
kind: Cluster
product: kind
registry: ctlptl-registry
name: kind-adoptingerlang
To create the cluster use `ctlptl apply`:
$ ctlptl apply -f cluster.yaml
Tilt works off of a file named Tiltfile at the root of the project. Stepping through the Tiltfile at the root of service_discovery it begins with:
default_registry('127.0.0.1:32000')
default_registry sets where to push Docker images built by Tilt, in this case the registry enabled in microk8s is used. This line is not actually required because Tilt will pick up that microk8s with an enabled registry is being used and automatically configure itself to use that registry.
Next the build of a couple of Docker images is configured, starting with service_discovery_sql:
custom_build(
    'service_discovery_sql',
    'docker buildx build -o type=docker --target dev_sql --tag $EXPECTED_REF .',
    ['apps/service_discovery_postgres/priv/migrations'],
    entrypoint="cp /app/sql/* /flyway/sql"
)
This image is built from the Dockerfile target dev_sql:
FROM busybox as dev_sql

COPY apps/service_discovery_postgres/priv/migrations/ /app/sql/
It only contains the SQL migration files and uses busybox so that the entrypoint can use cp. The third argument to custom_build, ['apps/service_discovery_postgres/priv/migrations'], tells Tilt to rebuild the image if any file in that directory, in this case the SQL migration files, changes. We will see how this image is used when we get to the kustomize deployment later in the Tiltfile.
Notice the function custom_build is used. Tilt offers a simpler function docker_build for building Docker images if that suites your needs. In the case of service_discovery we have specific targets in the Dockerfile to use and wanted to ensure the use of buildx.
The next image built is service_discovery, the main image used by the Deployment:
custom_build(
    'service_discovery',
    'docker buildx build -o type=docker --target dev_release --tag $EXPECTED_REF .',
    ['.'],
    live_update=[
        sync('rebar.config', '/app/src/rebar.config'),
        sync('apps', '/app/src/apps'),
        run('rebar3 as tilt compile'),
        run('/app/_build/tilt/rel/service_discovery/bin/service_discovery restart')
    ],
    ignore=["rebar.lock", "apps/service_discovery_postgres/priv/migrations/"]
)
Note that rebar.lock is explicitly ignored, this is because it gets rewritten at times when it hasn’t actually changed and Tilt does no comparison to verify a change has actually occurred, so would needlessly run the live_update instructions when Rebar3 is run locally. The migration files are also ignored because that is handled by the other Docker image.
The target is dev_release because we want the ability to do live updates simply by recompiling and restarting inside the running image:
# image to use in tilt when running the release
FROM builder as dev_release

COPY . .
RUN rebar3 as tilt release

ENTRYPOINT ["/app/_build/tilt/rel/service_discovery/bin/service_discovery"]
CMD ["foreground"]
The live_update instructions will run in the container any time a file changes. The Rebar3 profile tilt uses dev_mode for the release building, meaning to update the compiled modules in the release requires only running compile and not having to rebuild the whole release – see the Releases Chapter for more details on dev_mode and release building – so the update commands simply sync the apps directory to the running container, run compile and restart the release.
Finally, the Kubernetes resources to deploy are configured in the TiltFile, and we set a watcher to rerun it when any of the kustomize files change.
k8s_yaml(kustomize('deployment/overlays/dev'))

watch_file('deployment/')
Tilt has built-in support for kustomize so we use kustomize('deployment/overlays/dev') to render the dev overlay and pass to k8s_yaml which tells Tilt what Kubernetes resources to deploy and track.
The important differences from the base overlay in the dev overlay’s kustomization.yaml is the inclusion of the Postgres kustomize resources and a patch that is merged on the base resources:
bases:
- ../../base
- ../../postgres
patchesStrategicMerge:
- flyway_job_patch.yaml
The fly_job_patch.yaml is used to configure the Flyway job to work with the Tilt setup:
# For tilt we make an image named service_discovery_sql with the migrations.
# This patch replaces the image used in the flyway migration job to match.
apiVersion: batch/v1
kind: Job
metadata:
  labels:
    service: flyway
  name: flyway
spec:
  template:
    spec:
      initContainers:
      - name: service-discovery-sql
        image: service_discovery_sql
        volumeMounts:
          - name: migrations
            mountPath: /flyway/sql
        command: ["/bin/sh"]
        args: ["-c", "cp /app/sql/* /flyway/sql"]
This patch changes the image name in the Job resource to service_discovery_sql, the same name as the first custom_build image in the Tiltfile. Tilt will update the image with the latest tag, which it sets as $EXPECTED_REF in the environment of the Docker build command in custom_build, and reruns the Job. This way while service_discovery is running in the local Kubernetes if a new migration is added it will automatically be picked up and run on the database, keeping our development cluster in sync with our local development.
After running tilt:
$ tilt up
A console UI is brought up that shows the status of bringing up the difference resources that were passed to k8s_yaml in the Tiltfile and the logs associated with them:
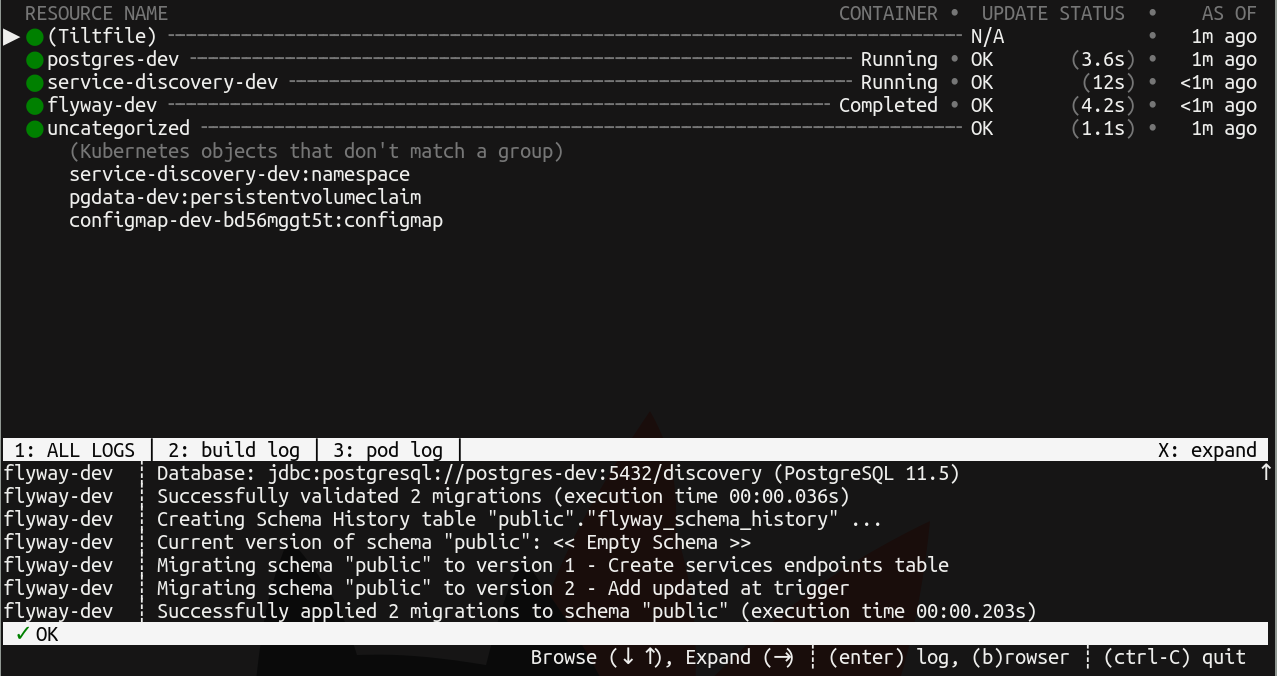
Tilt will also automatically open a page in the browser showing the same information:
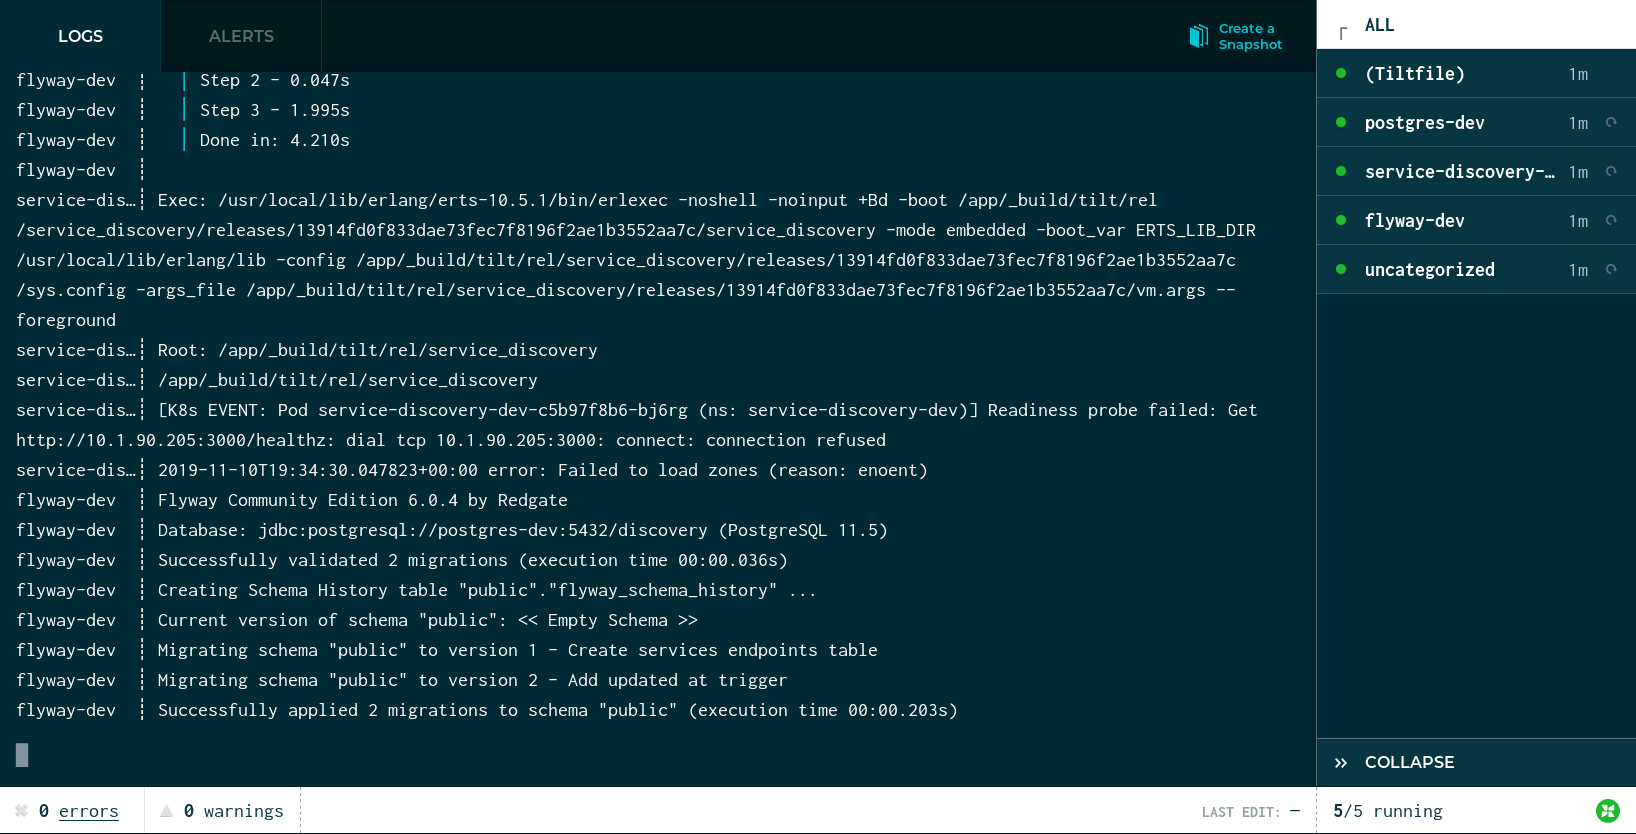
Using kubectl the IP of service_discovery can be found:
$ kubectl get services --namespace=service-discovery-dev
NAME                    TYPE        CLUSTER-IP       EXTERNAL-IP   PORT(S)                      AGE
postgres-dev            ClusterIP   10.152.183.116   <none>        5432/TCP                     16m
service-discovery-dev   ClusterIP   10.152.183.54    <none>        8053/UDP,3000/TCP,8081/TCP   16m
And we can interact with the running service_discovery through curl and dig to verify it is functioning properly:
$ curl -v -XPUT http://10.152.183.54:3000/service \
    -d '{"name": "service1", "attributes": {"attr-1": "value-1"}}'
$ curl -v -XGET http://10.152.183.54:3000/services
[{"attributes":{"attr-1":"value-1"},"name":"service1"}]
Clustering
Coming soon…
StatefulSets
Coming soon…